
Have you ever wished you could grow a whole salad’s worth of fresh greens right in your kitchen? Or maybe you crave juicy, homegrown tomatoes year-round, even with limited space. If that sounds like a dream, let’s talk about aeroponics. Imagine plants with their roots dangling in the air, getting a supercharged mist of water and nutrients – no soil needed! This is the magic of aeroponics, and it’s way more doable than you might think.
Aeroponics isn’t just a fancy gardening buzzword. It’s a game-changer, especially if you’re short on space or looking for insane growth speeds. Plants can grow faster in aeroponics, with less water waste, and you get total control over what they’re fed. Kinda sounds like plant superpowers, right?
Ready to unleash your inner green thumb? This guide will walk you through building your very own aeroponic garden, step by step. Whether you’re a seasoned gardener or a total newbie, by the end, you’ll be ready to start growing the freshest produce you’ve ever tasted – all thanks to the power of air!
What is Aeroponic Gardening?
Okay, so you get the idea that aeroponic gardening is a bit different from planting in the ground. But what exactly is going on here? Here’s the breakdown:
- Roots in the Air: The most striking thing about aeroponics is that your plants’ roots are literally suspended in mid-air within a growing chamber. No more digging in the dirt!
- The Power of Mist: Instead of soil, plants get everything they need from a fine mist of water packed with nutrients. This mist is sprayed directly onto the roots at regular intervals.
- It’s All About Oxygen: Because the roots are exposed, they soak up way more oxygen than they would in soil. This supercharged oxygen boost is one of the reasons why aeroponically grown plants can grow so fast and healthy.
Essential Components of an Aeroponic System
The beauty of an aeroponic system lies in its relative simplicity combined with high-tech efficiency. Let’s break down each essential part and understand how they work together to create a thriving environment for your plants:
- Reservoir: Think of the reservoir as the base camp for your aeroponic adventure. This container, which can range from a simple bucket to a larger tank, holds the nutrient-rich water solution that will nourish your plants. It’s crucial to choose an opaque reservoir to prevent light from entering, as this can promote algae growth and throw off the delicate balance of your nutrient solution.
- Pump: The pump is the workhorse that propels the nutrient solution from the reservoir up to the misting nozzles. Selecting a pump with the right power and flow rate is important to ensure your plants’ roots receive an adequate supply of nutrients and water.
- Spray Nozzles: These specialized nozzles are designed to atomize the nutrient solution into a fine, fog-like mist. This delicate mist enables the plant roots to easily absorb the essential nutrients and oxygen they need for rapid growth.
- Timer: A timer is your secret weapon for automating the feeding cycles of your aeroponic garden. By setting the timer, you’ll deliver precise bursts of nutrient mist to your plants’ roots at optimal intervals throughout the day, promoting healthy growth and reducing the risk of overwatering or underwatering.
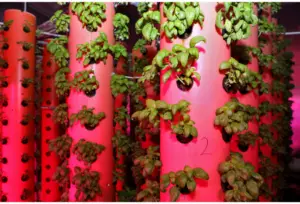
- Growing Chambers: Growing chambers provide the physical home for your plants within the aeroponic system. These chambers can be as simple as repurposed buckets or totes, or as sophisticated as vertical aeroponic towers designed for space efficiency. Their main function is to enclose the plant roots in a dark environment, protecting them from light and maintaining a humid atmosphere ideal for root development.
- Lights (if indoors): If you’re building your aeroponic garden indoors, you’ll need to provide your plants with a reliable light source. Grow lights specifically designed for horticulture deliver the spectrum of light that plants need for photosynthesis and optimal growth.
- Nutrients and pH Kits: The “food” for your plants comes in the form of specialized hydroponic nutrients. These concentrated solutions provide the precise mix of macro- and micronutrients that your plants need to flourish. Maintaining the correct pH level of your nutrient solution is also vital, as it affects your plants’ ability to effectively uptake those nutrients. A simple pH testing kit allows you to monitor and adjust the acidity of your solution as needed.
Planning Your Aeroponic Garden
Before you start assembling parts, it’s wise to put some thought into the design and placement of your aeroponic garden. Here’s what you’ll need to consider:
- Space Requirements: Aeroponic systems can be surprisingly space-efficient, especially vertical designs. Think about whether you have a dedicated corner indoors, a sunny spot on your patio, or perhaps room for a small greenhouse. Measure your available area to make sure your system of choice will fit comfortably.
- Types of Plants: While many plants thrive in aeroponics, some are better suited for beginners. Leafy greens like lettuce, spinach, and herbs are fantastic starter options. Some fruiting vegetables like tomatoes, peppers, and strawberries can also do well if your system is large enough to support their growth.
- Indoor vs. Outdoor Setup: Where your garden lives will dictate several factors. Indoor gardens need supplemental lighting, but you have more control over temperature and humidity. Outdoor setups rely on natural sunlight but might need protection from extreme weather conditions.
- Budget Considerations: Aeroponic systems can range from affordable DIY builds to more elaborate commercial setups. Having a rough budget in mind helps narrow down your choices and prevents overspending. Consider whether you prefer a premade kit or enjoy the hands-on process of sourcing components individually.
Step-by-Step Guide to Building a DIY Aeroponic System
Materials:
- Opaque storage tote or bucket (for the reservoir)
- Submersible water pump
- PVC piping or flexible tubing
- Spray nozzles (designed for aeroponics or hydroponics)
- Timer
- Net pots
- Drill with hole saw bit (size matching your net pots)
- Optional: Seed starting supplies (rockwool cubes, grow plugs, etc.)
Instructions:
- Prepare the Reservoir: Drill a hole in the side of your tote or bucket, close to the bottom. This is where you’ll install your water pump. Ensure the hole is the right size to fit the pump securely.
- Install the Pump: Place the pump inside the reservoir and feed its power cord through the hole you drilled. You can use aquarium sealant or a rubber grommet to create a watertight seal around the cord.
- Set Up the Misting System: Cut your PVC pipe or tubing to the appropriate length so that it reaches across the top of your reservoir. Determine the spacing for your spray nozzles and drill appropriately sized holes in the pipe or tubing. Securely install the spray nozzles.
- Attach Piping to Pump: Connect the PVC pipe or tubing to the output of your water pump. Make sure this connection is snug and watertight.
- Prepare the Lid: Carefully measure and mark the placement of your net pots on the lid of your reservoir. Use your drill and hole saw bit to cut holes just large enough for the net pots to fit through.
- Set Up the Timer: Program your timer to run the pump for short intervals (usually 15-30 seconds) with longer breaks in between (often several minutes). Specific misting cycles might need experimentation based on your plants, climate, and system size.
- Start Your Seeds (optional): If you’re not using pre-grown seedlings, start your seeds in rockwool cubes or grow plugs according to the seed packet instructions.
- Assemble Your System: Fill your reservoir with clean water and add your hydroponic nutrients according to the product directions. Place the lid with the spray nozzles on top of the reservoir, ensuring the nozzles are positioned to mist directly into the chamber.
- Add Your Plants: Once your seedlings have developed roots, gently place them into the net pots. You can add a bit of inert growing media like clay pebbles around the base of the plant for extra support.
- Power Up and Observe: Plug in your timer and pump. Your aeroponic garden is now up and running! Monitor closely for the first few days to ensure the misting cycle is working correctly and the plants are adjusting well.
Important Notes:
- Sanitation: Cleaning your system between growing cycles helps prevent disease and algae growth.
- Lighting: If indoors, position your grow lights an appropriate distance above the plants, ensuring they receive adequate light coverage.
- Nutrient Monitoring: Regularly check the pH and nutrient levels of your solution, adjusting as needed.
Maintaining Your Aeroponic Garden
An aeroponic garden is a dynamic system, and consistent maintenance is key to its long-term success. Here’s a breakdown of the essential tasks to keep your plants flourishing:
Daily Checks:
- Water Level: Ensure your reservoir has enough water to sustain the misting cycles. Top it off with clean water as needed.
- System Function: Check that the pump is running smoothly and the spray nozzles are misting evenly. Clear any clogs immediately to prevent uneven watering.
- Plant Health: Observe the leaves, stems, and roots for any signs of pests, disease, or nutrient deficiencies. Early intervention is crucial!
Weekly Tasks:
- Nutrient Testing and Adjustment: Use your pH kit to test your reservoir solution. Adjust the pH to the optimal range for your plants (usually slightly acidic, between 5.5-6.5). Use your hydroponic nutrient solution to replenish any depleted nutrients, following the product guidelines.
- Root Inspection: Gently lift a plant or two from the net pots. Healthy roots should be white or light-colored and have a fuzzy appearance. Address any signs of discoloration, rot, or excessive algae growth on the roots.
Monthly Tasks:
- Thorough Cleaning: Depending on plant growth and nutrient use, you may need to completely drain and clean your reservoir every few weeks or monthly. Rinse out any sediment and refill with fresh nutrient solution.
- Deep Inspection: Examine nozzles for any blockages or mineral buildup. Clean or replace as needed to ensure proper misting.
- Pruning (if needed): Prune plants to control their size, encourage bushiness, or remove unproductive foliage based on specific plant needs.
Tips:
- Keep a Log: Record water levels, pH adjustments, nutrient additions, and any plant observations. This helps you track patterns and optimize your system over time.
- Preventative Measures: Maintain a clean working area around your garden to minimize the risk of introducing pests or disease.
- Learn and Adapt: Every system and every plant has its own preferences. Ongoing observation and adjustments are part of the fun!
Tips and Tricks for Successful Aeroponic Gardening
Now that your garden’s up and running, here are some extra pointers to maximize your yields and overall enjoyment:
- Optimal Lighting (Indoors): Research the specific light requirements of your chosen plants. Provide adequate light intensity and duration using the appropriate type of grow lights (LEDs are often energy-efficient).
- Manage Root Health: Airtight, humid growing chambers can increase the chance of root rot. Maintain good airflow around the root zone, and consider adding a small air pump and airstone to your reservoir to increase dissolved oxygen levels.
- Trellising: If you’re growing taller or vining plants, providing a trellis or support system will help manage their growth and make harvesting easier.
- Experiment with System Upgrades: As your confidence grows, try incorporating a pressure regulator for more precise mist control, different nozzle types for ultrafine misting, or even automation features with sensors and smart controls.
- Advanced Techniques for Increased Yields: Research pruning methods, plant training techniques (like low-stress training, or LST),, and pollination strategies (if growing fruiting vegetables) to unlock greater harvests.
Remember: Aeroponics is exciting because there’s always something new to learn and try! Don’t be afraid to start simple and then gradually make adjustments or incorporate new elements as your knowledge grows.
Common Mistakes to Avoid in Aeroponic Gardening
Even the most enthusiastic aeroponic gardener can encounter challenges along the way. Being aware of these common pitfalls will help you sidestep them!
- Incorrect Nutrient Management: Underfeeding will stunt plant growth, while overfeeding can cause nutrient burn. Carefully follow the directions on your hydroponic nutrient solution and observe your plants’ responses.
- Inconsistent Misting Cycles: If roots dry out, your plants will suffer. Power outages or timer malfunctions can disrupt your schedule. Consider a backup battery for your pump as a safeguard.
- Neglecting pH: If your nutrient solution’s pH levels are off, plants won’t be able to effectively absorb nutrients. Monitor pH frequently and adjust as needed.
- Ignoring Sanitation: Dirty reservoirs or equipment breeds bacteria and algae. Regular cleaning and occasional sanitation of your system components is essential.
- Insufficient Light: Especially indoors, weak light leads to slow growth and leggy plants. Make sure your light source and its placement provide the appropriate intensity for your plant types.
- Poor Root Zone Management: Overcrowding your plants inhibits root development. Space them according to their mature size to allow ample room for healthy growth.
Don’t Get Discouraged: Mistakes are part of the learning process! Careful observation, troubleshooting, and a willingness to adapt will help you overcome any obstacle in your aeroponic gardening journey.
Cost Analysis and Budgeting
One of the common questions about aeroponic gardening is “Is it worth the cost?”. Let’s break it down:
- Initial Investment: Setting up an aeroponic system often has a higher upfront cost compared to starting a traditional soil garden. You’ll need specialized components like the pump, nozzles, and reservoir. Prices can vary widely depending on whether you build your own, buy a pre-made kit, or opt for a high-tech commercial setup.
- Running Costs: One of the major advantages of aeroponics shines through in running costs. Due to their incredible water efficiency, aeroponic systems use significantly less water than soil-based gardening. Nutrient costs are usually comparable, though aeroponics can sometimes allow for slightly more concentrated solutions.
- Long-term Savings: Over time, the faster growth cycles and potential for higher yields with aeroponics can offset the initial setup cost. With less water usage and minimized need for pest or disease control, you may actually save on resources compared to traditional gardening.
- Intangible Benefits: Beyond dollar-for-dollar comparisons, consider the advantages of year-round fresh produce at your fingertips, greater plant control, and the pure satisfaction of growing with this innovative technology.
Tips for Budget-Friendly Aeroponics:
- Start Small: DIY a single-bucket system to dip your toes in without breaking the bank.
- Repurpose Materials: Use secondhand food-grade buckets or totes for your reservoir.
- Source Strategically: Compare prices for components from online retailers, hydroponics shops, and even aquarium suppliers.
- Choose Low-Maintenance Plants: Begin with fast-growing leafy greens for quicker harvests and satisfaction.
To Sum it Up
By now, you’ve seen that aeroponic gardening isn’t just about cutting-edge technology— it’s about unlocking the amazing potential of plants. With faster growth, higher yields, and incredible control over your growing environment, aeroponics opens a world of possibilities. Whether you’re yearning for fresh herbs in the dead of winter or dream of a space-efficient balcony overflowing with vegetables, aeroponics can help you achieve it.
Yes, it takes a bit of learning and tinkering, but that’s part of the adventure! Remember, resources abound online and within the passionate community of aeroponic gardeners. So, are you ready to revolutionize the way you garden? It’s time to unleash the power of plants and air!
Your Next Steps
- Share Your Success: Did you start your own aeroponic garden? We’d love to see it! Snap a picture of your setup or thriving plants and tag us on social media [insert your social media handles]. Use the hashtag #airpoweredgarden to connect with other growers.
- Got Questions?: Building your garden and feeling a bit stumped? Leave a comment below or reach out through our website’s contact form. We’re a community of learners – let’s help each other out!
- Want Even More?: If you’re hungry for more aeroponics knowledge, be sure to sign up for our newsletter. You’ll get exclusive tips, project ideas, and even the occasional special offer delivered right to your inbox.
Option for Further Monetization: If you’re so inclined, you can even hint at a more comprehensive guide or downloadable resource:
- Ready to Dive Deeper?: For those who want a super detailed walkthrough of every stage, we’re developing a comprehensive Aeroponics Made Easy ebook. Join our newsletter to be notified when it launches!
FAQs: Your Aeroponic Gardening Questions Answered
- Is aeroponics difficult for beginners? Aeroponics can be beginner-friendly! Start with a simple system, choose easy-to-grow plants, and be willing to learn as you go. There are tons of online resources and communities to support you.
- Can I grow any plant aeroponically? Many plants thrive in aeroponics, particularly leafy greens, herbs, and some fruiting vegetables (like tomatoes and strawberries). Larger, root-heavy plants may be less suitable for smaller systems.
- Is aeroponics more expensive than soil gardening? The initial setup cost can be higher, but aeroponics saves money long-term due to reduced water use and often faster harvests.
- Do I need special lighting indoors? Yes! Regular house lights won’t suffice. Invest in grow lights specifically designed for horticulture to give your plants the spectrum they need.
- How often do I need to check the nutrient solution? Check pH and nutrient levels weekly. You might need to adjust them more frequently with fast-growing plants or smaller reservoirs.
- What if the power goes out?
Short outages are usually fine, but extended outages can dry out roots. Consider a backup battery for your pump as a precaution. - Is aeroponics messy? Not particularly! The contained systems limit spills, but occasional splashes from misting might occur.
- How does aeroponics compare to hydroponics? Aeroponics is a type of hydroponics where roots are suspended in air rather than submerged in water. Aeroponics often leads to faster growth due to increased oxygenation.
- Can I build my own aeroponic system? Absolutely! Many DIY plans exist online, ranging from simple bucket setups to more complex systems.
- Where can I learn more about aeroponics? Explore online forums, dedicated aeroponics websites, and even check your local library or university extension program.